How to Make a Diaper Stroller
Easy Instructions to Creating Your Own
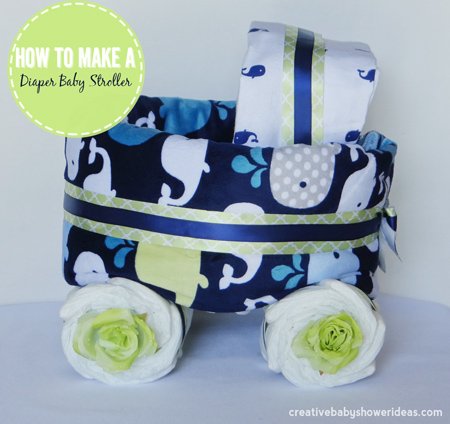
I have been getting a lot of requests for instructions on how to make a diaper stroller lately, so I decided to put together a tutorial to help you create one on your own. My favorite part was finding cute baby items to use on it. I love going baby shopping!
I found the cute blanket and receiving blanket set at Target and the ribbon was from Hobby Lobby and JoAnns. If you do not have access to cute stores for baby clothing or you are looking to match an exact theme, amazon is a great place to find the perfect matching sets.
These make beautiful gifts to give at a baby shower. The best part is that all of the diapers and baby items are 100% useable for the new mommy.
I've seen tutorials where the diapers are hot glued into place. I make sure to never glue or damage the diapers/supplies when I create my gifts. The whole purpose is to give the baby items as gifts so it would be a shame to ruin anything with glue, etc.
Just a warning, it is easy to make but there are a lot of steps to it. I took lots of photos to make it as easy as possible for you to re-create. Ready to begin?
You Will Need:
- 1 baby blanket
- 3 receiving blankets
- Ribbon
- 76 Diapers
- Glue Dots
- Safety pins- I used 2-3 jumbo size and 1 regular
- Rubber bands
-mine were 3 1/2 inch by 1/4 inch
- Baby bib
- 4 Fake flowers
- Paper towel roll or dowel rod
Making the Wheels
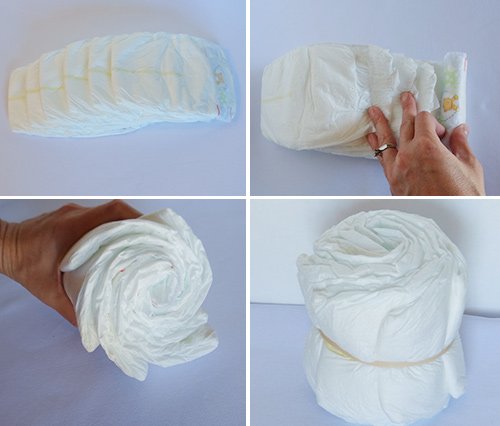
Stack 6 diapers on a flat surface with the front design facing up. Slide the diapers out so that the folded edge of the diapers are separated but still in line with each other. Flip the diapers over and roll them like a snowball. It should look like a swirl pattern when you are done. Place a rubber band around the middle of the diapers to hold it all together. Repeat the steps until you have 4 diaper wheels.
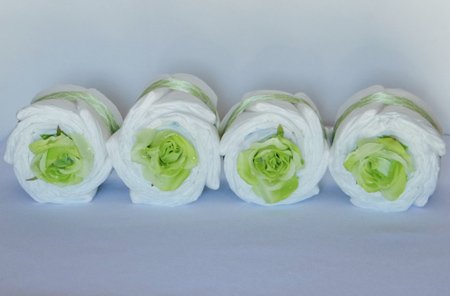
Wrap ribbon around each "diaper wheel" to cover the rubber band and secure in place with a glue dot. I also put my 4 fake flowers in the center to get an idea how it will look when it is fully assembled.
Creating the Stroller Bed
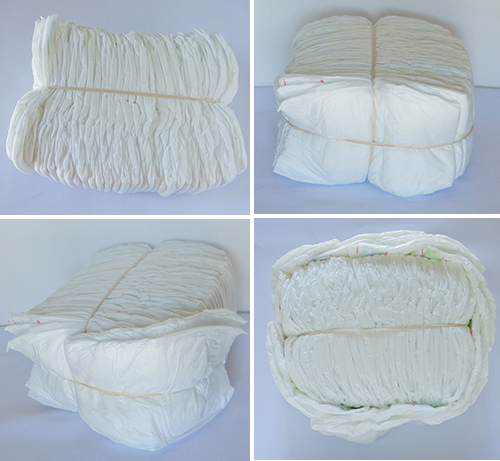
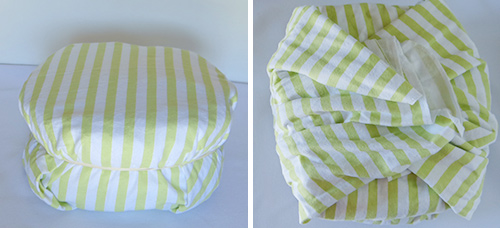
Place 36 diapers side by side and wrap a rubber band around the middle. Place another rubber band around the opposite side so that it looks like a "t" when looking from the side. Slide 7 diapers under the outside rubber band, going all the way around the edge of the diaper bed. It should give a smooth finish on the outside.
Place the diaper bed in the center of a receiving blanket and wrap it around it. Place a rubber band around the middle to hold it in place. The top of the bed should be smooth with the excess blanket folded up underneath.
Making the Diaper Pillow
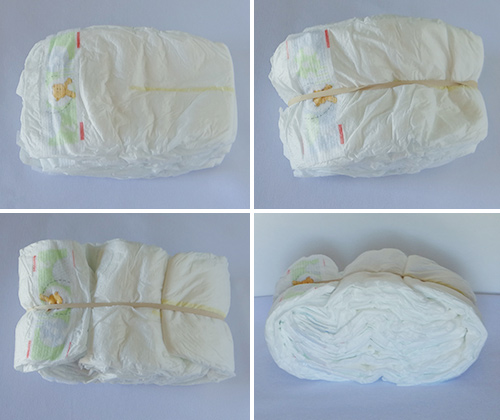
Stack 7 diapers and place a rubber band around the middle. To round the edges of the pillow, slide one diaper on each side and wrap around the edge.
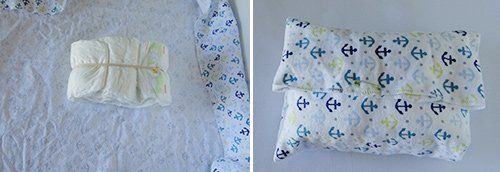
Place diaper pillow in the middle of a receiving blanket and wrap blanket around it. Use a safety pin to hold in place. Wrap a rubber band around the outside edge of the pillow to secure.
Attaching the Pillow to the Bed
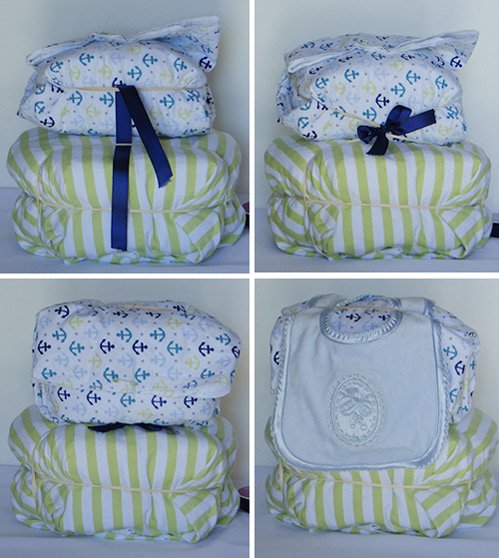
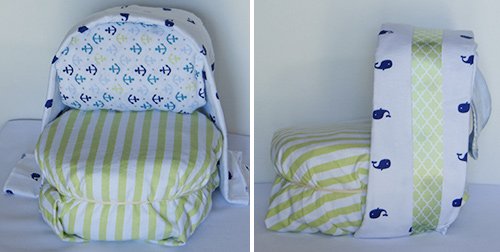
Place a rubber band on one side of the stroller bed, approximately where you want the pillow to sit. Place the pillow face down on the bed with the bottom edge next to the rubber band. Slide a ribbon through both the pillow rubber band and the rubber band you placed on the bed. Tie a bow to hold the pillow in place. Slide a baby bib under the top of the rubber band to cover the back of the receiving blanket.
Attaching the Stroller Hood
Fold a receiving blanket lengthwise and center it over the top of the pillow. Wrap a ribbon over the center of the receiving blanket and secure underneath with glue dots.
Attaching the Diaper Wheels
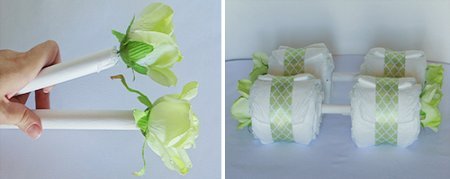
You can attach your wheels either by using the cardboard center of a paper towel roll or a dowel rod. I used a dowel rod because it was what I had on hand and it is a sturdy center support. If you use a paper towel roll, I suggest stuffing the ends with paper towels so it is not as flimsy.
For using a dowel rod, I cut 2 sections (about 10 inches wide each). I covered it with white tissue paper I had on hand. You can also use gift wrapping paper, scrap booking paper or even paint it to get the desired color. Then I hot glued a flower to one end and slid 2 diaper wheels on. Then I hot glued a flower on the opposite side to hold it all in place.
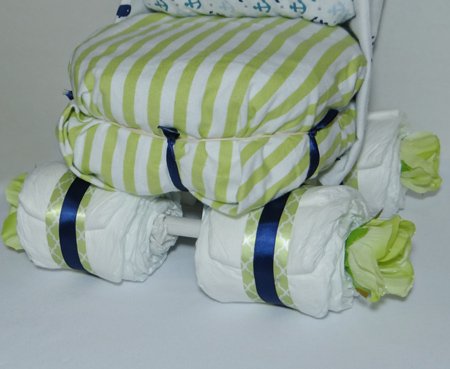
To attach the wheels to the stroller, I tied a ribbon to the rubber band in the front of the stroller and then ran it underneath and attached it to the rubber band on the other side. I also ran a second ribbon from left to right, approximately where the diaper wheels would connect.
To attach the front wheels, wrap a ribbon around a dowel rod and tie it to the ribbon going front to back to hold the wheels in place. Do the same to attach the back wheels. To add a little more "security" to the structure I placed a glue dot on the ribbon of each wheel exactly where it met the ribbon above it. So the front wheels where attached to the blue ribbon going left to right. The back wheels were attached to the ribbon holding on the hood. Make sense?
Attaching the Blanket
My blanket is a little more "plush" than most of the blankets you see used on diaper carriages. I would also guess that it is a little bigger in size too. But it is ULTRA soft and I know my friend will love it, so it was the one I wanted to use. I would agree that a smaller blanket would probably look better on the stroller, but hey, it's the one I wanted to give so I made it work. ;)
I folded the blanket in thirds lengthwise to give the edges of the stroller a clean look. To do this, fold each side in to the center so that the edges touch. Then fold in half again lengthwise. Wrap the blanket around the stroller, with the center of the blanket in front. Use a couple jumbo safety pins to hold it in place in the back. If there is edging on your blanket that shows like mine, fold the edging under as you are pinning.
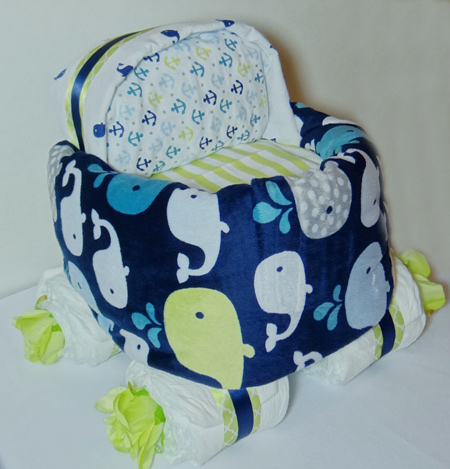
Wrap a ribbon around the blanket and tie a bow in back. I ran out of ribbon so my bow was little but if you have enough ribbon, make a big beautiful bow to finish it off!
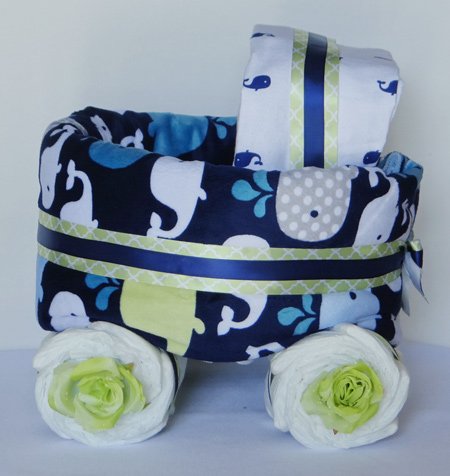
There you have it! An easy but beautiful gift made of simple baby items. I hope you enjoyed our tutorial. Be sure to come back and share your finished photos with us!




New! Comments
Have your say about what you just read! Leave me a comment in the box below.